Ambrosia Symbiosis > Lab Protocols
  • Back to Ambrosia Symbiosis Main
  • Lab
  • Create Protocol
  • Edit Protocols
Home» Articles posted by craigbateman

Articles posted by craigbateman

Plate photography

Posted on May 25, 2015 by craigbateman in Fungi


  1. Download Canon EOS Utility to your computer: Download link
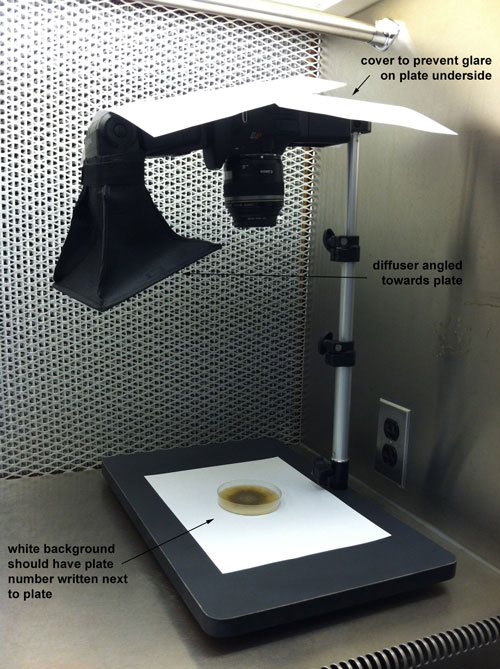
    (Listed as “EOS Digital Solution Disk Software”)
  2. Ensure photo setup is as pictured (in the flow hood in Adam’s office on the 2nd floor):
    IMG_1341
  3. Hook your computer up to the camera to enable live shooting and direct photo downloads.
  4. Turn on the hood blower and wipe down all surfaces with 70% ethanol.
  5. Set the camera dial to M (Manual) and adjust to the following settings:
    Manual focus
    Large resolution (use Raw for poster photos)
    Shutter 1/100
    F9.0
    ISO 400
    Spot metering
    Flash white balance setting
    WB Shift: B5 G2
    As it appears on the EOS Utility:
    EOS plate settings
  6. Set a plate open-side-up underneath the camera and manually focus the camera to the top of the agar.
  7. Add a piece of paper displaying the underlying plate number in the photo.
  8. Proceed taking photographs of the top and bottom of each plate. Settings do not need to be altered between plates/photographs.
  9. Save photographs to our lab drive (Forest Entomology:\Plate photos) and name them according to plate number (eg: “plate number XXXX.jpg”)
  10. Keep the plate at 4-10° C until ready for discard. Plates should be discarded into an autoclave bag.

    **Note on batteries for flash: Only use Panasonic eneloop batteries. All batteries should be equally charged. Disconnect batteries after use. Battery charger is in camera drawer in Hulcr lab.

M13 amplification procedure

Posted on June 23, 2014 by craigbateman in General Molecular Work

PCR mastermix

per rxn
Taq

12.5 uL

M13

2.5 uL

template

1 uL

water

9.5 uL


  1. Use the cycling conditions labeled as M13 (under Lab or Martin) on Hulcr lab thermocycler.
  2. For extra care (ie publications), prepare a replicate PCR for each extraction.


Running the gel


  1. Prepare a 1% agarose gel (careful, it will be fragile). Make sure the gel is level when pouring!
  2. Use extra reagents, but make sure the volume will fit in the comb you use for making the wells:
ladder 9ul
template 9ul
dye 2ul


  1. When loading, arrange samples from similar morphotypes together. If replicate PCRs were prepared, do not group them directly next to corresponding replicate sample.
  2. Place both a 100bp and 1000 bp ladder on either side of every 5-10 reactions ran. This will aid in reading the gel, and will help to show if the DNA is moving at different speeds in different parts of the gel.
  3. Run for up to 3 hours at 100-110V. Check every 45min-1 hour and take photo. The longer you run the gel, the more differentiated the bands will become, making it easier to read.


Reading the gel:


  1. Use a photo editor (ie photoshop) to adjust the contrast/brightness so that all bands can be seen and differentiated between samples.
  2. Use a line tool in the photo editor to connect bands in ladders with the same lengths. Use the slope of these lines to gage the distances traveled between samples.
  3. Note any differences in fragment location and presence/absence between samples. Same species should be basically identical in their arrangement. Samples that appear different should be sequenced at a variable locus for confirmation.

Morphotyping

Posted on March 7, 2014 by craigbateman in Fungi

The process of designating morphotypes is probably the most  important step in distinguishing which fungi are associated with beetles. For this reason, careful assignments should be made from observations collected at different times and DNA data collected from multiple isolates per morphotype and per beetle.

After isolation of fungi from beetles, fungi need to grow to sufficient size to allow for elucidation of macroscopic characteristics (ie color, size comparison/growth rate, texture, etc). Additional methods for differentiation morphotypes may be deployed at this step, including culturing duplicate dilutions in darkness vs. fluorescent (+blue-black-blue) light.

Subculture: 5-10 days post isolation
Before subculturing, create preliminary morphotypes by recording the original isolation plate # and the phenotype on the back of a subculture plate. Indicate which CFU(s) will be sampled on the isolation plate, and photograph them (front & back) without opening. For each morphotype, subculture two different CFUs per plate

DNA extraction and RAPD: 7-14 days post subculture
Once subcultures have grown sufficiently, single colony subcultures should be photographed prior to DNA extraction. In pure culture/at a larger size, subcultured fungi may display slightly different phenotypes than those observed on isolation plates, and may allow for re-assessment of preliminary morphotypes (or grouping order in RAPD gel).

After DNA extraction, perform a RAPD PCR reaction (m13 primer & cycling) by grouping similar morphotypes next to each other on the gel. If the results are unexpected, a single-direction PCR of a more variable locus (or loci) can be used to test the accuracy of the RAPD result.

Database entry and CFU quantification
New or existing morphotypes can now be entered into the database. This will also create a new “final” plate number for subcultures, which needs to be recorded on the plate (see photo). CFU counts can be calculated using isolation plate photos as a reference. Relevant isolates should be subcultured to cryo-tube slants and preserved.

Final subcultures should look like this:


Summer 2014 field work plan

Posted on March 7, 2014 by craigbateman in Craig

China: Jun 9-Aug 3rd (EAPSI) – offer and 5K stipend accepted.

  • Project goals:
    • Pine/oak beetle-associated fungi
    • Trapping/collecting high diversity of beetles
    • X. crassiusculus for biogeography project
    • Cryphalines from wood
    • Train new student for work in Thailand
    • Project outcomes and final report due to NSF by Dec. 1
  • Preparation:
    • Solidify plan of research with Wang Bo. Negotiate details for finding sufficient sites/tree spp., acquiring an assistant, etc.
    • NSF orientation in Arlington April 3-4
    • Acquire visas, materials

Thailand: Aug 3-8

  • Give talk at International Mycological Congress in Bangkok

Spring 14 compactus

Posted on February 10, 2014 by craigbateman in Craig

Goal: In order to gain higher resolution in X. compactus fungus community, more isolates need to be genotyped to confirm whether morphotypes are consistent with one or multiple Fusarium species.

How:
-Isolate fungi from 15 beetles in Gainesville caught from 3 locations.
-Perform quick RAPD to determine morphotype consistency.
-Send 5 isolates per morphotype isolated from different beetles to Kerry.
-Update CFU, isolation, and PCA data for paper.
-Use fungus identifications to begin pathogenicity experiment.

Mini culture slants

Posted on September 6, 2013 by craigbateman in Fungi

Small culture slants have the advantage of easy storage, integration with our database system, and safe shipping to collaborators.

  1. Sterilize 2mL cryotubes by autoclaving or prolonged exposure to UV light.
  2. Under a biosafety hood, arrange the open tubes in a rack so that the open end of the tubes face almost horizontally (about 15° ).
  3. Expose the tubes to UV light again if necessary to ensure they are not contaminated.
  4. Add about 1mL of autoclaved media (usually PDA) to the bottom of the tube.
  5. Let the media harden and cool UNDER AN ANGLE in the hood before adding the tube caps.
  6. Store in the fridge.

mini culture slant

Following this, you may culture the fungus on the slant media, label it with a scolytos vial number, and place it in the incubator, slightly open with parafilm, to grow. After the media has a culture, you may add 10-20% glycerol to fill the vial, close it completely and use the “Mr. Freeze” jar to slowly bring it down to freezing in the -20C. It can then be moved to the -80C for long term storage.

For sending the tubes to collaborators:

  1. Keep the culture for a couple days before shipping to make sure the fungus is growing and isn’t contaminated.
  2. Wrap the lid-tube joint with parafilm, so that the lid doesn’t get loose.
  3. Tape the tube to a piece of paper so that it doesn’t roll around in the envelope during shipping.
  4. Make sure it is sufficiently padded and that the tube and envelope are labeled.
  5. Ship IMMEDIATELY: there is very little oxygen for the fungus to breathe.

shipping minislant

Summer fungus work

Posted on May 12, 2013 by craigbateman in Adam

Maintaining subcultures:

Please check on the plates once a week, and subculture them once a month. I’ve attached a spreadsheet listing the plates that need to maintained- all of which are currently kept in a single incubator (top-right). Subcultures are plated onto quarter-strength PDA (7.6g PDA, 15g agar). Please copy the number from the initial isolate plate onto the subculture plate, also on the subculture plate add a letter indicating which subsequent subculture it is (eg 5230= initial isolate plate, 5230A= first subculture, 5230B= second subculture, and so on). Subcultures should be stored in a 10 deg C incubator.

Creating culture slants:

Please innoculate mini culture slants with fungi from plates. See the spreadsheet to see what plates correspond with what tube numbers. Culture slants are created using cryo tubes filled with 1 mL of PDA hard (36g PDA with 15g agar). Isolates are inoculated in the media and allowed to grow for a few days in the tube with a loose cap. Once the fungus has sufficiently colonized the surface of the media, the tubes are filled with 1mL of 20% glycerol and stored at -20C. Cryo tubes should be labeled on the top and side with the vial number. After you do this, could you update the website with this protocol and please add any additional info you feel is necessary.


PCR and sequencing:

All DNA extracts are kept in blue racks in the freezer. Primers which need to diluted are kept in shared boxes in the freezer labeled PRIMERS. Please make your own box with primer dilutions (or use your own from Jason’s lab). Exosap, extaq, etc. are in a box labeled SHARED.  Ladder and dye are in racks or sample boxes on the door of the fridge. I will provide a spreadsheet that details DNA extracts to undergo PCR, and the mastermix contents for the 25 uL reactions.

Asian ambrosia fungi

I’ll be sending back culture slants of fungi from Asia, which might need to be subcultured at DPI. Jiri or I will let you know what the needs are for this as they arise.


slants

Posted on May 8, 2013 by craigbateman in Brian

Hi Brian,

Could you make 1 L of PDA hard, and 150 culture slants each with 1mL of PDA hard?

An ordered list

Posted on May 2, 2013 by craigbateman in Brian

Here’s an updated list in order of priority:
1. Make more TAE (see a below post by Caroline for instructions)
2. Make 1L of PDA quarter strength
3. Consolidate pipette boxes (see post immediately below)
4. Autoclave beaker full of blue pestles (30 min)
5. Add remaining yellow caps to tubes
6. Vials for -80 freezer (see a below post from Caoline)
7, Adding cryotubes to database

Things to do

Posted on May 1, 2013 by craigbateman in Brian

Hi Brian,

Here are some things that need to be done:
Autoclave beaker full of blue pestels
Add remaining yellow caps to tubes

See below posts for:
Photographing plates for Martin.
Aliquoting different PBS amounts for Caroline and Craig
Vials for -80 freezer
Adding cryotubes to database

  • 1
  • 2
  • 3

View Lab Protocols

  • expandBacteria
  • expandBeetles
  • expandCurrent Work
  • expandDatabase
  • expandFungi
  • expandGeneral Molecular Work
  • expandMiscellaneous
  • expandPathology
  • expandSequence Analysis

(c) 2013 Ambrosia Symbiosis Lab Protocols

Cleantalk Pixel