Ambrosia Symbiosis > Lab Protocols
  • Back to Ambrosia Symbiosis Main
  • Lab
  • Create Protocol
  • Edit Protocols
Home» Articles posted by Paloma

Articles posted by Paloma

Artificial Pith Gallery (APG) construction

Posted on July 24, 2016 by Paloma in Beetles

Making Artificial Pith Galleries

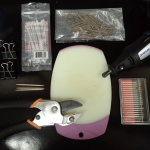
Supplies:
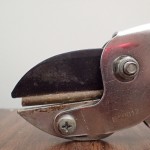
– Anvil style pruner
– Small cutting board
– Rotary tool and attachments
– Sections of stem inter-nodes (~4-5cm long, ~0.4-0.5cm thick, sweetgum preferred for X. compactus)
– Cable ties
– Binder clips
– Toothpicks

CH1

1. Collect fresh stem sections, preferably 4-5cm long and 0.4-0.5cm thick.

2. Use pruners to cut stick open, down the middle lengthwise.

CH2

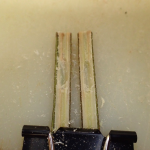
3. Secure each half of stick, cut side up, onto bottom edge of cutting board using binder clips.

4. Use rotary tool with the rounded grinding attachment (See photo) to create a gallery 1-1.5cm in length by removing pith. Make sure not to go past the pith of the wood. Do this on both stick halves so that it is a mirror image.

CH3

5. Use a toothpick to remove any excess sawdust.

6. Take one stick half and flip over, bark side up now, and switch to a fine-point grinding attachment (see photo) to drill the entrance hole for the beetle. This should be done in the center of the gallery.

CH4

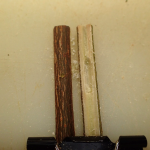
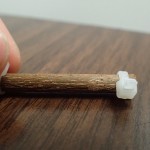
7. Remove binder clips and join the two stick halves together, making sure they line up the original way prior to cutting. If done right, each gallery half should come together in the same place to form a full gallery. There shouldn’t be space in the cut between the two halves.

8. Use a cable tie to secure each end of the stick, continuing to hold it together while tightening. Cut excess off with pruner.

9. Freeze until ready to use and then autoclave to sterilize.
CH5

Weekly beetle colony maintenance

Posted on June 23, 2016 by Paloma in Beetles

Daily beetle colony maintenance
I. New females

1. Check black tubes for emergent females. Set aside emergent females. Check collection dates on black tubes. Discard any sticks older than 45 days. Clean emptied tubes with bleach, dry completely, and store in zip lock bags.

2. Thaw frozen sticks for newly emerged females. Seal stick ends with wax (paraffin or parafilm). Place in new sterile petri dishes.

3. Add emergent females, 1 per stick, per petri dish. Label petri dish with date. Place in Starter Box

II. Starter Box

1. Check starter box for excavating beetles. Label dishes with excavating females with the “bored – in” date and unique ID number. Move dish to Working Colony and enter ID and “bored – in” date in spreadsheet.

2. Discard any dishes with dead females, signs of mites, or females that have failed to bore in for longer than 5 days.

III. Working colony

1. Check Working Colony spreadsheet for ripe galleries. Harvest galleries that have reached the “ripe date”. Date will depend on current demand for experiments (ask James). If eggs are needed, this will be 4 – 6 days after “bored – in date”. If pre-pupae are needed, this will be 14 – 16 days after “bored – in” date.

i. Harvesting

1. Place sterile #40 Whitman filter paper in sterile petri dish and moisten with 500 ul sterile PBS.

2. Use sterile pipet tips to transfer eggs/pre-pupae to moistened filter paper, being as fast and sanitary as possible. Add no more than 12 eggs or 6 pre-pupae per filter paper. Wear gloves and clean gloves with EtOH between every stick.

3. If gallery is in good shape and may produce more eggs/pre-pupae, carefully reclose gallery, taking care not to crush beetles. Use small strips of parafilm to bind the ends of the stick back together. Record “opened” date on petri dish and spreadsheet. Return petri dish to working colony. Check 2-3 days later.

4. Discard spent galleries and remove from spreadsheet.

ii. Specimen treatments

1. If current experimental protocol requires axenic larvae/pre-pupae, apply chemical treatment per protocol to eggs/pre-pupae on filter paper (ask James for protocol).

2. Transfer cleaned eggs/pre-pupae to fresh sterile filter paper in new sterile petri dish. Label dish with “harvested” date and chemical treatment, then seal petri dish with parafilm, and move it to the small incubator (27° C).
 
Weekly beetle colony maintenance

Monday: Clean Starter Box and re-supply stocks.

1. Remove all petri dishes

2. Pour perlite into autoclave bag using large funnel and autoclave. Leave
perlite in closed autoclaved bag for use next week.

3. Wipe down container with bleach solution. Dry well.

4. Replace with autoclaved and cooled perlite from previous week.

5. Check and replenish stocks of sterile filter papers, sterile tubes of PBS, media, etc.

Tuesday: Collect fresh galleries.

1. Collect as many occupied X. compactus galleries as possible. Effort will have to be adjusted to match need/loss. Only collect galleries with female visible at entrance.

2. Cut twigs to fit in black tubes. Seal cut twig ends with wax.

3. Place 4-6 galleries per clean black tube. Put tubes in walk-in hot freezer.
Wednesday: Clean Working Colony.

6. Remove all petri dishes/ tubes

7. Pour perlite into autoclave bag and autoclave.

8. Wipe down container with bleach solution. Dry well.

9. Replace autoclaved perlite, petri dishes, and tubes.
Thursday: Collect fresh sticks.

1. Find sweet gum stems 2-6 mm in diameter. Cut sticks ~5 cm length, with no nodes!

2. Collect enough sticks to replace what was used in previous week.

3. Store in zip lock bag in freezer

View Lab Protocols

  • expandBacteria
  • expandBeetles
  • expandCurrent Work
  • expandDatabase
  • expandFungi
  • expandGeneral Molecular Work
  • expandMiscellaneous
  • expandPathology
  • expandSequence Analysis

(c) 2013 Ambrosia Symbiosis Lab Protocols

Cleantalk Pixel