Ambrosia Symbiosis > Lab Protocols
  • Back to Ambrosia Symbiosis Main
  • Lab
  • Create Protocol
  • Edit Protocols
Home» Fungi

Fungi

Importing live fungi

Posted on December 15, 2015 by jirihulcr in Fungi

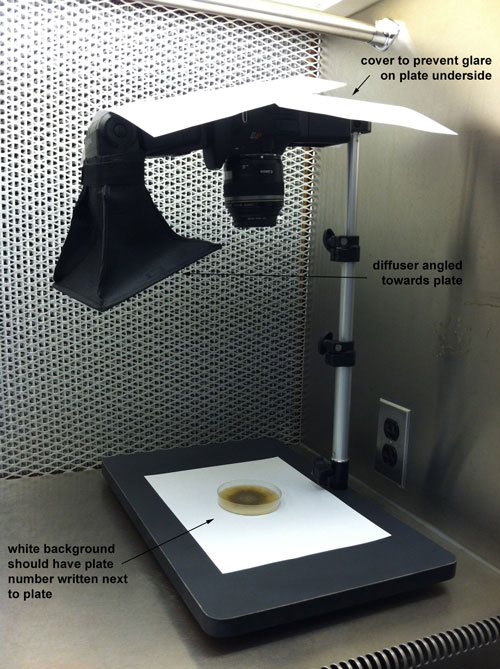
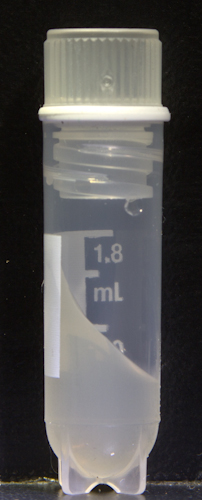
These are the conditions on our USDA permit for hand-carrying live fungi through airport customs. All fungi have to be on minislants.

1. At least TWENTY days prior to each hand carry incident, the permit holder or designee must notify the PPQ Permit Compliance Officer by email ( re*********************@ap***.gov ) to provide specific information on the hand carrier’s identity, the anticipated first port of arrival into the United States, the actual date of arrival, the time, and, if travel is by airline, the flight number. The Compliance Officer will notify Customs and Border Protection (CBP) Agriculture Specialist at the port of entry to document and facilitate the entry of the organisms.
2.The hand carrier must indicate that living organisms are being imported under a USDA permit on the Customs Declaration form if such form is required at the port of entry.
3.At the port of entry, individuals carrying permitted organism must also present to CBP officers the following articles: Passport or Visa and a valid hand carry PPQ Form 599 Red/White label corresponding to the permit.
4.Inspection by CBP Officers must confirm that all hand carried articles are securely packaged as per the permit conditions. In the event that a problem is detected, the CBP officer may seize the package and require its movement to the nearest PPQ Inspection Station for processing, clearance or destruction. The permit holder will be responsible for all costs incidental to such forwarding.
5.After CBP confirmation and clearance through the first port of entry into the United States, hand carried organisms must be transported directly to the containment facility authorized in the permit.
6.Upon arrival at the facility, the PPQ Compliance Officer must be notified within 24 hours that the organisms arrived. Notification may be by fax (301-734-5392) or email ( re*********************@ap***.gov ). Notification must be by an independent third party (e.g. containment facility director, departmental chair, campus biosafety officer, etc.). The notification must include the permit number, label number, date of arrival, the specific organisms that were imported, their origin, and quantity. Failure to notify the PPQ compliance officer may result in loss of hand carry privileges. A PPQ inspector may also visit the facility to confirm the arrival of the package and its contents.
7. ONLY PERSON(S) WHOSE NAME(S) IS/ARE LISTED IN THE ISSUED PERMIT IS/ARE AUTHORIZED TO HAND CARRY.
8. You will receive NEW PPQ Form 599 Red/White labels for each hand carry event once you have submitted the required information. You can NOT use the red and white labels described above that are prepared for BONDED CARRIERS. If you use the PPQ Form 599 Red/White labels for bonded carrier while attempting to hand carry, the package will be seized by the Department of Homeland Security and destroyed.
9. An authorization to hand-carry includes only the organism identified in the permit. Presence of unauthorized organisms in any packages on an individual authorized to hand-carry is a permit violation. Presence of unauthorized organism at the receiving containment facility at any time is also evidence of a permit violation.

Plate photography

Posted on May 25, 2015 by craigbateman in Fungi


  1. Download Canon EOS Utility to your computer: Download link
    (Listed as “EOS Digital Solution Disk Software”)
  2. Ensure photo setup is as pictured (in the flow hood in Adam’s office on the 2nd floor):
    IMG_1341
  3. Hook your computer up to the camera to enable live shooting and direct photo downloads.
  4. Turn on the hood blower and wipe down all surfaces with 70% ethanol.
  5. Set the camera dial to M (Manual) and adjust to the following settings:
    Manual focus
    Large resolution (use Raw for poster photos)
    Shutter 1/100
    F9.0
    ISO 400
    Spot metering
    Flash white balance setting
    WB Shift: B5 G2
    As it appears on the EOS Utility:
    EOS plate settings
  6. Set a plate open-side-up underneath the camera and manually focus the camera to the top of the agar.
  7. Add a piece of paper displaying the underlying plate number in the photo.
  8. Proceed taking photographs of the top and bottom of each plate. Settings do not need to be altered between plates/photographs.
  9. Save photographs to our lab drive (Forest Entomology:\Plate photos) and name them according to plate number (eg: “plate number XXXX.jpg”)
  10. Keep the plate at 4-10° C until ready for discard. Plates should be discarded into an autoclave bag.

    **Note on batteries for flash: Only use Panasonic eneloop batteries. All batteries should be equally charged. Disconnect batteries after use. Battery charger is in camera drawer in Hulcr lab.

Morphotyping

Posted on March 7, 2014 by craigbateman in Fungi

The process of designating morphotypes is probably the most  important step in distinguishing which fungi are associated with beetles. For this reason, careful assignments should be made from observations collected at different times and DNA data collected from multiple isolates per morphotype and per beetle.

After isolation of fungi from beetles, fungi need to grow to sufficient size to allow for elucidation of macroscopic characteristics (ie color, size comparison/growth rate, texture, etc). Additional methods for differentiation morphotypes may be deployed at this step, including culturing duplicate dilutions in darkness vs. fluorescent (+blue-black-blue) light.

Subculture: 5-10 days post isolation
Before subculturing, create preliminary morphotypes by recording the original isolation plate # and the phenotype on the back of a subculture plate. Indicate which CFU(s) will be sampled on the isolation plate, and photograph them (front & back) without opening. For each morphotype, subculture two different CFUs per plate

DNA extraction and RAPD: 7-14 days post subculture
Once subcultures have grown sufficiently, single colony subcultures should be photographed prior to DNA extraction. In pure culture/at a larger size, subcultured fungi may display slightly different phenotypes than those observed on isolation plates, and may allow for re-assessment of preliminary morphotypes (or grouping order in RAPD gel).

After DNA extraction, perform a RAPD PCR reaction (m13 primer & cycling) by grouping similar morphotypes next to each other on the gel. If the results are unexpected, a single-direction PCR of a more variable locus (or loci) can be used to test the accuracy of the RAPD result.

Database entry and CFU quantification
New or existing morphotypes can now be entered into the database. This will also create a new “final” plate number for subcultures, which needs to be recorded on the plate (see photo). CFU counts can be calculated using isolation plate photos as a reference. Relevant isolates should be subcultured to cryo-tube slants and preserved.

Final subcultures should look like this:


Mini culture slants

Posted on September 6, 2013 by craigbateman in Fungi

Small culture slants have the advantage of easy storage, integration with our database system, and safe shipping to collaborators.

  1. Sterilize 2mL cryotubes by autoclaving or prolonged exposure to UV light.
  2. Under a biosafety hood, arrange the open tubes in a rack so that the open end of the tubes face almost horizontally (about 15° ).
  3. Expose the tubes to UV light again if necessary to ensure they are not contaminated.
  4. Add about 1mL of autoclaved media (usually PDA) to the bottom of the tube.
  5. Let the media harden and cool UNDER AN ANGLE in the hood before adding the tube caps.
  6. Store in the fridge.

mini culture slant

Following this, you may culture the fungus on the slant media, label it with a scolytos vial number, and place it in the incubator, slightly open with parafilm, to grow. After the media has a culture, you may add 10-20% glycerol to fill the vial, close it completely and use the “Mr. Freeze” jar to slowly bring it down to freezing in the -20C. It can then be moved to the -80C for long term storage.

For sending the tubes to collaborators:

  1. Keep the culture for a couple days before shipping to make sure the fungus is growing and isn’t contaminated.
  2. Wrap the lid-tube joint with parafilm, so that the lid doesn’t get loose.
  3. Tape the tube to a piece of paper so that it doesn’t roll around in the envelope during shipping.
  4. Make sure it is sufficiently padded and that the tube and envelope are labeled.
  5. Ship IMMEDIATELY: there is very little oxygen for the fungus to breathe.

shipping minislant

Lactaphenol blue slide mount

Posted on April 8, 2013 by craigbateman in Fungi
  1. Place a drop of 70-95% ethanol on a microscope slide.
  2. Immerse the fungal material in the drop of alcohol.
  3. Add one or at most two drops of the lactophenol blue stain before the alcohol dries out.
  4. Holding the coverslip between forefinger and thumb, touch one edge of the drop of alcohol/stain with the coverslip edge, and lower gently to avoid air bubbles.
  5. Ring the edge of the coverslip with nail polish to prevent desiccation  This way, the mount will last for days to months.

Permanent Storage

Posted on April 3, 2013 by adamblack in Fungi

Freezing

  • glycerol (most fungi an bacteria do well in 10%, some need 20%) or mineral oil (messy)
  • Put three agar plugs (or just chunks of mycelium, or one big chunk, whatever is easier) from each plate into its respective storage vial. Agar plugs (cubes with fungus) or pieces of mycelium can be cut with scalpel; make sure that scalpel is perfectly sterilized after each culture. Take the growing edge of the fungus, or a whole growing colony, not the old crusty center.
  • If you are using minislants – just pour the sterile 20% glycerol in the minislant tube
  • Place in Mr. Frosty (blue/white container on top of the fridge). Fill up the bottom compartment with isopropyl alcohol (in the chemicals storage). Put in -80C freezer. It will freeze slowly, 1C per minute.
  • Record in the Scolytos Database!!! Each isolate will get genus name “fungus” and its unique Species name will be its Isolate name from the isolations database. In “count”, record 1.

Reviving

Prepare:

  • vials with 1mL PBS. (Label them with numbers corresponding to frozen samples)
  • equal number of PDA plates (label these with regular database numbers)
  • sterilizer, scalpel

1. Take out sample. 2. Cut gel disk inside the tube with carefuly sterilized scalpel. 3. Use only one half (other half stays). 4. Put half-disk in vial with PBS, shake briefly to rinse off surplus glycerol or mineral oil, and put on PDA plate.

Measuring Fungal Growth

Posted on April 3, 2013 by adamblack in Fungi

Using multimode detector (plate reader) Beckman Coulter DTX 880 to measure absorbance at 630nm with a 20×20 detector grid, using sterile 24-well Costar plate with a lid against contamination, 1 ml of media per well. Measured on the first day and on fourth day, comparing (cellulose media minus negative control) versus (positive control minus negative control).

Vortex chunk of fungus mycelium, take 0.1 ml of supernatant, add to 0.9 ml of media.

Testing Fungi For Cellulose

Posted on April 3, 2013 by adamblack in Fungi

Assays

Filter paper assay

Testing for utilization of pure unaltered cellulose

  • control-noble (neg. control)
  • filter paper
  • PDA (pos. control)

CMC & Congo Red assay

Testing for cellulose-degrading enzymes

  • control-salts (neg. control)
  • CMC-salts
  • CMC-PDB_0.25
  • dextrose-salts
  • PDA (pos. control)

MCC assay

Testing for cellulose carbon utilization (i.e., growth)

  • control-noble (neg. control)
  • MCC-salts
  • MCC-PDB_0.25
  • PDA (pos. control)

Media needed (all media per 1L, all with 20ml/L Penicillin&Streptomycin):

  • control-noble: 15g noble agar, salts* 0NS
  • control-salts: 15g normal agar, salts* 0S
  • MCC-salts: 5g MCC, 15g noble agar, salts* MNS
  • MCC-PDB_0.25: 5g MCC, 0.25g PDB, 15g regular agar M-green
  • CMC-salts: 5g CMC, 15g normal agar, salts* CS
  • dextrose-salts: 5g dextrose, 15g normal agar, salts*
  • CMC-PDB_0.25: 5g CMC, 0.25g PDB, 15g regular agar C-green
  • filter paper: piece of autoclaved Whatman filter paper 15g regular agar, salts* 0S

salts*

(prepare 10x solution ahead= 10X of the following per 1L, autoclave):

Salts Amount
KH2PO4 0.2 g
NH4Cl 0.25 g
KCl – 0.5 g
CaCl2 0.15 g
NaCl 1 g
MgCl 0.6 g (or 1.2g if hydrated)
K2SO4 2.84 g

include in media through filter after autoclaving: 1ml of 1000x trace minerals solution 10ml of 100x trace vitamins solution

Media based on Czapek-Dox

Czapek-Dox-CMC (cellulose degradation test)

Ingredient Amount
penicillin & streptomycin 20 ml of 100x stock/L
KH2PO4 1g
MgSO4*7H2O 0.5g
KCl 0.5g
FeSO4*7H2O 0.01g
cellulose 30g
NaNO3 2g
noble agar 20g
water 1L

Czapek-Dox neg. control (no carbon source)

Ingredient Amount
penicillin & streptomycin 20 ml of 100x stock/L
KH2PO4 1g
MgSO4*7H2O 0.5g
KCl 0.5g
FeSO4*7H2O 0.01g
cellulose 30g
NaNO3 2g
noble agar 20g
water 1L

Czapek-Dox-dextrose (positive control) Czapek-Dox neg. control (no carbon source)

Ingredient Amount
penicillin & streptomycin 20 ml of 100x stock/L
KH2PO4 1g
MgSO4*7H2O 0.5g
KCl 0.5g
FeSO4*7H2O 0.01g
dextrose 30g
NaNO3 2g
noble agar 20g
water 1L

The Czapek-Dox doesn’t work for Raffaelea – doesn’t grow on positive control. Try different media – Czapek-Dox with proteins, or with little bit of yeast extract, or dextrose+salts+NaNO3.


Yeast Nitrogen Base media – Liquid

Tested media:

1) Prepare YNB&AA& antibacterials 10x stock: 6.7g YNB&AA and 20mL Streptomycin/Penicillin concentrate, in 100mL water. Use warm water, but do NOT autoclave! Store in dark and cold place.

2)YNB- CMC-liq (do not use MCC – not soluble, not usable in absorbance measurements)

  • water 90mL
  • CMC 3g
  • after autoclaving: 10ml YNB&AA&antibacterials 10x stock through filter. pH: 5.7

YNB- dex-glu-liq

  • water 90ml
  • dextrose 1.5g
  • glucose 1.5g
  • after autoclaving: 10ml YNB&AA&antibacterials 10x stock through filter

YNB- blank-liq

  • water 90mL
  • after autoclaving: 10ml YNB&AA&antibacterials 10x stock through filter


Yeast Nitrogen Base media

1) prepare YNB&AA 20x stock: 26.8 g in 200mL warm water, do NOT autoclave! Store in dark and cold place.

2) autoclave 50 pieces of filter paper (the same size as last time) as you are autoclaving the media

3) media:

YNB-CMC

  • water 950 mL
  • agar 15g
  • CMC 30g
  • after autoclaving: 50ml YNB&AA 20x stock through filter

YNB-dex-glu

  • water 950ml
  • agar 15g
  • dextrose 15g
  • glucose 15g
  • after autoclaving: 50ml YNB&AA 20x stock through filter

YNB-filter_paper

water 950 mL

  • agar 15g
  • one piece of filter paper,
  • after autoclaving: 50ml YNB&AA 20x stock through filter

YNB-blank

  • water 950mL
  • agar 15g
  • after autoclaving: 50ml YNB&AA 20x stock through filter

Congo Red assay

Prepare Congo Red solution (1g/L) and 1M solution of NaCl (58g/L). Overlay plate with Congo Red for 15 minutes, pour off, overlay with NaCl for 15 minutes, pour off, look for zone of clearing

Extraction of Fungi From Beetles

Posted on April 3, 2013 by adamblack in Fungi

Protocol

Materials

  • 1000ul and 100ul pipettes
  • pipettes tips
  • two pairs of fine hard forceps
  • petri dishes for beetle dissection
  • microscope in hood
  • vials
  • vial rack
  • sterile 1X PBS
  • alcohol-resistant marker

General notes

  1. Wash the beetle with a surfactant and/or saline, to get most of the dirt off. You don’t need to get every last fungal spore off the surface (we will dilute those away). You also don’t need to use any toxic solutions, often used in older works. Some people use ethanol for surface sterilization; it probably helps in removing some contaminants, but there is also a high percentage of the mycangial symbiots that die. We have tested it…
  2. Don’t grind up the whole beetle – focus on the right body part. If the mycangium is in the head, use the head (most Xyleborini). If it’s in the prosternum (for example, Xyloterini, Corthylini) or pronotum (Platypodinae), use the prothorax. If it’s in the mesonotum (the Xylosandrus–Anisandrus clade of Xyleborini) it gets a bit trickier, but with a little practice you will learn how to excise that general part of the body out as well. The main point is to avoid most of the surface, the alimentary canal (particularly the hind gut which is full of yeasts) and the space under elytra, which also hosts many unwanted associates (including nematodes). Yes – the space under the elytra is dirty. When you want to study the microbial associates of people’s mouth, you also don’t grind up the whole person.
  3. Dilution plating! This is the ESSENTIAL part of the process. Plate several dilutions of your inoculum, and use the lowest one where some Colony Forming Units end up growing in the end. The goal here is to dilute away all the non-specific associates which are likely present in lower abundances, and only capture the abundant symbionts. Those are typically present in thousands of cells, so you have a good chance of getting mostly those in the lowest dilution.

Dilution plating

  1. Prepare two tubes per each sample, label them “0.1” and “0.01”, fill each with 500 ul of water or PBS.
  2. Suspend mycangium in the tube “0.1” and vortex.
  3. Plate 50 ul of the suspension on media. Record the plate as “0.1 dilution” in [PLATES].[note] in the Isolations database.
  4. Transfer 50 ul of the initial suspension to the second tube (“0.01”) and vortex.
  5. Plate 50 ul of the second suspension on second media plate, and record that plate as “0.01 dilution”.
  6. Plate 5 ul of the second suspension on a third plate, and record it as “0.001 dilution”.

Quantititive extraction for fungus community characterization:
See Calculating colony-forming units

Calculating Colony Forming Units

Posted on April 3, 2013 by adamblack in Fungi

To estimate the initial number of colony-forming units in a mycangium, use the technique of serial dilution. See Database protocols for Isolations databse for how to accurately input this information into the database.

Isolation

  1. Prepare two tubes per each sample, label them “0.1” and “0.01”, fill each with 500 ul of water or PBS.
  2. Suspend mycangium in the tube “0.1” and vortex.
  3. Plate 50 ul of the suspension on media. Record the plate as “0.1 dilution” in [PLATES].[note] in the Isolations database.
  4. Transfer 50 ul of the initial suspension to the second tube (“0.01”) and vortex.
  5. Plate 50 ul of the second suspension on second media plate, and record that plate as “0.01 dilution”.
  6. Plate 5 ul of the second suspension on a third plate, and record it as “0.001 dilution”.

Calculation of CFU count

Multiply the number of colonies on the plate by the inverse of the initial dilution factor.

  • 1
  • 2

View Lab Protocols

  • expandBacteria
  • expandBeetles
  • expandCurrent Work
  • expandDatabase
  • expandFungi
  • expandGeneral Molecular Work
  • expandMiscellaneous
  • expandPathology
  • expandSequence Analysis

(c) 2013 Ambrosia Symbiosis Lab Protocols

Cleantalk Pixel