- Download Canon EOS Utility to your computer: Download link
(Listed as “EOS Digital Solution Disk Software”) - Ensure photo setup is as pictured (in the flow hood in Adam’s office on the 2nd floor):

- Hook your computer up to the camera to enable live shooting and direct photo downloads.
- Turn on the hood blower and wipe down all surfaces with 70% ethanol.
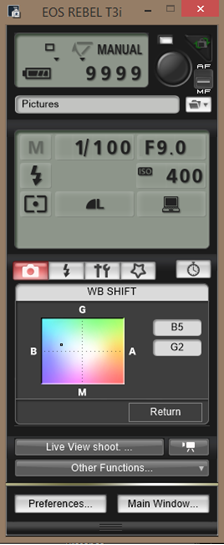
- Set the camera dial to M (Manual) and adjust to the following settings:
Manual focus
Large resolution (use Raw for poster photos)
Shutter 1/100
F9.0
ISO 400
Spot metering
Flash white balance setting
WB Shift: B5 G2
As it appears on the EOS Utility:

- Set a plate open-side-up underneath the camera and manually focus the camera to the top of the agar.
- Add a piece of paper displaying the underlying plate number in the photo.
- Proceed taking photographs of the top and bottom of each plate. Settings do not need to be altered between plates/photographs.
- Save photographs to our lab drive (Forest Entomology:\Plate photos) and name them according to plate number (eg: “plate number XXXX.jpg”)
-
Keep the plate at 4-10° C until ready for discard. Plates should be discarded into an autoclave bag.
**Note on batteries for flash: Only use Panasonic eneloop batteries. All batteries should be equally charged. Disconnect batteries after use. Battery charger is in camera drawer in Hulcr lab.
